
Preventive and remedial measures according to §6 & §7 LkSG - Detailed step-by-step instructions on the Prewave platform
2.3.1.1 The Measures & Actions section:
2.3.1.2 Segmentation and filter options:
2.3.1.3 Recommended Actions (measures suggested by Prewave)
2.3.1.4 Measures, scorings and items
2.3.1.5 Overview of measures already implemented/planned
2.3.1.6 Creating, pausing or skipping individual measures
2.3.1.7 Action planning for multiple suppliers
2.3.1.8 The action window (action planning)
2.3.1.9 Skip Multiple Actions: How to document the termination or completion of actions
2.3.1.10 Supplier overview in action planning / execution of actions
2.3.1.11 Creating, pausing or skipping individual actions
2.3.1.12 Taking corrective action in the risk analysis
2.3.1.13 The status of measures
2.3.1.14 Side topic: The actions section
2.3.1.15 Side topic: Self-assessments
2.3.1.16 The reporting section
2.3.1.1 The Measures & Actions section:
Once the high-risk suppliers have been identified, preventive and remedial measures can now be taken with the selected suppliers in the risk analysis in the "Measures & Actions" section:

Fig. 1: Overview of the Measures & Actions section
2.3.1.2 Segmentation and filter options:
As in the "Suppliers" tab, filters can also be set in the "Measures and actions" area. Simply use the filter bar (see Fig. 2) to reduce the selection of suppliers, edit certain supplier groups according to collections or action priorities, for example. The filter function works with "And" statements; only those suppliers that fulfil all the conditions in the previously defined filters are displayed.
![]() Useful knowledge: Collections can be used to determine responsibilities within the Prewave platform.
Useful knowledge: Collections can be used to determine responsibilities within the Prewave platform.
![]()
Fig. 2: Filter options
The filter selection can also be extended, to the right of the options mentioned, by selecting the "More Filters" field, the measure group (if measures have already been set for certain suppliers) and the 360° risk score can also be used as filters (see Fig. 3):
.png?width=688&height=145&name=Abb.%203%20-%20Weitere%20Filterungsm%C3%B6glichkeiten%20(Erg%C3%A4nzung%20um%20Ma%C3%9Fnahmengruppen%20und%20den%20360%C2%B0%20Score).png)
Fig. 3: Further filter options (addition of measure groups and the 360° score)
2.3.1.3 Recommended Actions (measures proposed by Prewave)
Under the "Recommended Actions" tab, Prewave suggests preventive and remedial actions with different intensities ("severity"), which are determined on the basis of the action priority. The suggested measures are displayed in the aforementioned tab in fields with a blue background (see Fig. 4.)
![]() Reminder: The action priority of the respective suppliers is determined using the following two values:
Reminder: The action priority of the respective suppliers is determined using the following two values:
- the supplier's Overall Risk Score (Peer Score + Alert Score + Assessment Score + External Data Score)
- the impact (the ability to influence) on the supplier (comparison of the supplier's real turnover and the company's own expenditure vis-à-vis the supplier)
The categorisation of the intensity of the proposed measures (from S1 to S4, while the measure class "S4" carries the highest weighting) is based on the action priority identified at the supplier. For suppliers with a "high action priority", measures up to intensity "S3" (e.g. from incident reviews and assessments to awareness training, desk audits) are proposed, while "S4" measures (on-site audits or, in the most serious case, offboarding of the supplier) are also recommended for critical suppliers. In principle, a low-intensity measure is always suggested for suppliers in the first step, regardless of the priority of action.
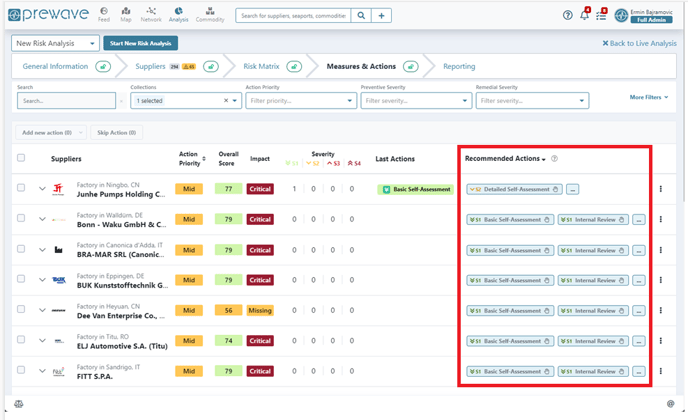

Fig. 5: Creating a recommended action
![]() Useful knowledge: The creation of an action is described in more detail in chapter "2.3.1.8 The action window (action planning)"
Useful knowledge: The creation of an action is described in more detail in chapter "2.3.1.8 The action window (action planning)"
2.3.1.4 Measures, scorings and items
If the user now decides to carry out one of the suggestions, the action window opens, where more detailed information on the measure to be carried out can now be entered. Depending on which action has been selected, it is also possible to add attachments to the action planning.
🤓 Examples: Attachments can only be selected for the following measure types:
-
Self-Assessments
-
Detailed Self-Assessments
-
Code of Conduct
-
Awareness Trainings
-
Statement Requests
-
On-Site Audits
Attachments/items can be stored in the action depending on the selected measure type and sent to the supplier's contact person. As part of a self-assessment, for example, readily available Prewave questionnaires can be sent which are specifically tailored to the LkSG areas (for each relevant LkSG event type group there are separate questionnaires which cover these areas and evaluate them in detail, e.g. environment, labour/human rights, etc.) (see Fig. 6). ) (see Fig. 6), CoCs that are sent as part of Code of Conduct Assessments (see Fig. 7) or, for example, a Detailed Self-Assessment (see Fig. 8) where you also have the option of sending your own questionnaires (these must first be imported into the environment and integrated).
 Fig. 6: Creation of a basic self-assessment, as an attachment to the "Labour & Human Rights" questionnaire
 Fig. 7: Creation of a Code of Conduct measure including the "Prewave Code of Ethics" as an attachment to be sent
 Fig. 8: Planning a detailed self-assessment; in this example the questionnaire "Labor & Human Rights", which is part of any LkSG package on Prewave, has automatically been attached.
![]() Reminder: The assessment score accounts for 20% of the supplier's overall score. Depending on the evaluation of the assessment carried out, this can have a positive or negative influence on the assessment score.
Reminder: The assessment score accounts for 20% of the supplier's overall score. Depending on the evaluation of the assessment carried out, this can have a positive or negative influence on the assessment score.
If no assessments are available for the supplier, the 20% will be distributed amongst the other scoring parts.
When selecting the basic self-assessment as the preferred measure, the system checks which attachment should be used to send to the respective supplier before moving to the action window. In this explicit example, the supplier is affected by a poorer scoring in the area of environment - High Action Priority as well as a scoring value of 70 in the area of environment with a generally high impact on the supplier (see Fig. 9):

Fig. 9: Proposed measures based on the priority for action in the area of the environment
If a proposed measure is now selected by Prewave, the focus is also automatically placed on the "worse" event type group. In this specific case, the supplier is affected by a poorer scoring of the "Environment" risk group, which is why the environmental questionnaire is suggested as a suitable attachment when the basic self-assessment is selected as the preferred measure (see Fig. 10):

Fig. 10: Based on the scoring in the "Environment" area, Prewave suggests the environment questionnaire as a suitable attachment
2.3.1.5 Overview of measures already implemented/planned
In the "Last Actions" column, all actions that have already been scheduled for the supplier can be viewed. Further information can be taken from the "Severity" tab, such as the number (preventive and remedial actions), the status and the associated intensity of the actions already set.
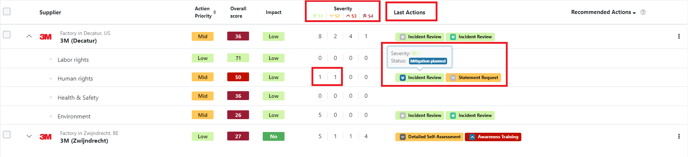
Fig. 11: Overview of measures already planned or implemented, including status, prioritisation and type of measure
![]() Useful knowledge: The background colours of the measures in the Last Actions area provide information about the intensity of the measures (as already explained in chapter 2.3.1.3 Recommended Actions):
Useful knowledge: The background colours of the measures in the Last Actions area provide information about the intensity of the measures (as already explained in chapter 2.3.1.3 Recommended Actions):
-
S1 → light green
-
S2 → orange
-
S3 → light red
-
S4 → dark red
2.3.1.6 Creating, pausing or skipping individual measures
In addition to the option of planning or skipping collected actions, there is also the option of planning your own/individual actions if the actions proposed by Prewave are not appropriate (e.g. because the actions should have a greater effect or influence on the supplier). Individual actions can be defined for each supplier individually by selecting the three-point form and selecting the "Add New Action" field (see Fig. 12). In addition to the option of planning individual actions, all actions already set for individual suppliers can also be skipped under "Skip All Actions" in the same action window after selecting the three-point form:
Fig. 12: Creation of individual measures in the supplier overview
2.3.1.7 Action planning for multiple suppliers
It is also possible to define measures for several suppliers using the checkbox:
 Fig. 13: Selection of the suppliers for which measures are recommended to be planned
In the next step, the user can decide on the preferred type of action, or more precisely, whether a preventive or remedial action should be taken for the selected suppliers. After selecting the appropriate action category, the action window opens, where all further details are stored and the action can be finally created (the action window is described in the next chapter).

Fig. 14: Selection between preventative or remedial measures
2.3.1.8 The action window (action planning)
Once the selection has been made, the action window opens, where a bundled action can now be initiated for several suppliers (see Fig. 15) - here the user now has the option of defining again whether a preventive or remedial action (1) and which type/kind of action (2) is to be defined for the selected suppliers. If the "Type" field is selected, all possible types of measures that can be defined for the supplier appear here. Furthermore, a title (3), a due date (4), the organisation (5) (if the customer works with several organisations), the responsible team (6) or the person responsible for the measure (7) can also be defined for each measure.
 Fig. 15: The action window and the associated customisable values
%20k%C3%B6nnen%20unterschiedliche%20Ma%C3%9Fnahmetypen%20selektiert%20werden.png?width=411&height=390&name=Abb.%2012%20-%20Je%20nach%20ausgew%C3%A4hlter%20Kategorie%20(Abhilfe-%20oder%20Pr%C3%A4ventionsma%C3%9Fnahme)%20k%C3%B6nnen%20unterschiedliche%20Ma%C3%9Fnahmetypen%20selektiert%20werden.png)
Fig. 16.: Depending on the selected category (remedial or preventive measure), different types of measures can be selected
![]() Useful knowledge: As can be seen in the action window, teams can also be created within the Prewave environment. Teams can then be used to execute specific workflows within the organisation: Team A, B and C, for example, are responsible for processing the "NPM" collection, while Team D and E are responsible for the "PM" collection and the suppliers it contains. As explained, the workflow can also be organised according to action priorities - Team A processes all suppliers with a "critical and high action priority" while Team B is responsible for all suppliers with a "medium priority".
Useful knowledge: As can be seen in the action window, teams can also be created within the Prewave environment. Teams can then be used to execute specific workflows within the organisation: Team A, B and C, for example, are responsible for processing the "NPM" collection, while Team D and E are responsible for the "PM" collection and the suppliers it contains. As explained, the workflow can also be organised according to action priorities - Team A processes all suppliers with a "critical and high action priority" while Team B is responsible for all suppliers with a "medium priority".
If the "Team" field is now selected in the action window, all available teams from your own organisation appear (see Fig. 17). To be able to select a team, it must have been created in advance with the corresponding team members. Teams can be created and edited by selecting the user profile in the top right-hand corner under the "Your Teams - Manage Teams" tab (see Fig. 18/19).

Fig. 17: Selection of Teams

Fig. 18: Teams can be managed under “Your teams - Manage Teams”
 Fig. 19: Existing teams can be edited by selecting the pencil icon, while new teams can be created by selecting the "New Team" field
Once a team has been selected in the action window, the assignee can be selected in the "Assignee" field in the next step (see Fig. 20). Only those users who belong to the previously defined team are displayed. If no team has been defined in advance, all users of the corresponding organisation are displayed in the "Assignee" field.
 Fig. 20: Selection of an authorised representative within the "Team A - Test" team
In the last step of measure planning in the action window, an attachment ("item") can also be added, depending on the selected measure. However, as explained in chapter "2.3.1.4 Measures, scorings and items", this only applies to certain measure types. If a different type of measure is selected, the "Main Item" field is hidden. Attachments can generally be questionnaires, CoCs, alerts (for a statement request) or assessment training/on-site audits, for example, which can be used to evaluate the supplier (see Fig. 21 - Code of Conduct as an example). The topic of items is discussed again in more detail in chapter "2.3.1.12 Side Topic: Self-Assessments".
.png?width=490&height=460&name=Abb.%2017%20-%20Auswahl%20des%20bevorzugten%20Items%20(z.B.%20Fragebogen%2c%20Code%20of%20Conduct%20etc.).png)
Fig. 21: Selection of the desired item (e.g. questionnaire, code of conduct, etc.)
2.3.1.9 Skip Multiple Actions: How to document the termination or completion of actions
Just like the option to determine actions for several suppliers, there is also the option to skip or pause further actions for several suppliers at the same time. The skip function can also be triggered next to the button for bundled action planning under "Skip actions" (see Fig. 22):

Fig. 22: Skip Actions function
If the "Skip Action (X)" field is selected, the action window opens, where you can now define the period (1) for how long the specified actions should be skipped/paused and the reason (2) for doing so (see Fig. 23).
🤓 Beispiele: There may be various reasons for skipping the measures, e.g. that:
-
the supplier is no longer active (e.g. because it has been acquired by another company or has filed for insolvency) or there is generally no longer a supplier relationship → here, for example, it would be expedient to pause the measures without specifying a definite period of time, as the supplier will be inactive for an unforeseeable period of time.
-
the influence on the supplier is too small, as the purchasing volume is too low compared to the supplier's turnover. For example, your company can order all of its IT equipment from Amazon, but will have no influence on Amazon because the company's turnover is too high. Accordingly, it makes no sense to plan measures here.
-
there is little or no risk for the supplier → action planning can be postponed to the start date of the next reporting period
-
all planned measures have already been implemented, the risks have been mitigated or have not been confirmed -> here, for example, the planning of new measures can be postponed until the next risk analysis, as sufficient measures have already been implemented for the current reporting period
-
the incident is no longer relevant, outdated or has already been resolved.
 Fig. 23: The action window, where the pause date and the reason for pausing the actions can now be defined

Fig. 24: Indication in the action window why the measures are paused or postponed
2.3.1.10 Supplier overview in action planning / execution of actions
Selecting the drop-down arrow next to the supplier's checkbox in the Measures & Actions overview opens the respective LKSG scoring of the supplier's risk groups. Here you will find all the measures that have already been scheduled, as well as further information such as the status (Completed, Requested, Not Received, Outdated, In Progress), the intensity and the scoring resulting from the implementation of the measure.

Fig. 25: Supplier overview - summary of the LKSG scoring and planned/implemented measures at the supplier
If one of the self-assessments shown is now selected, the action window opens, allowing the user to view more details about the measure already set and to revise or add the relevant information.
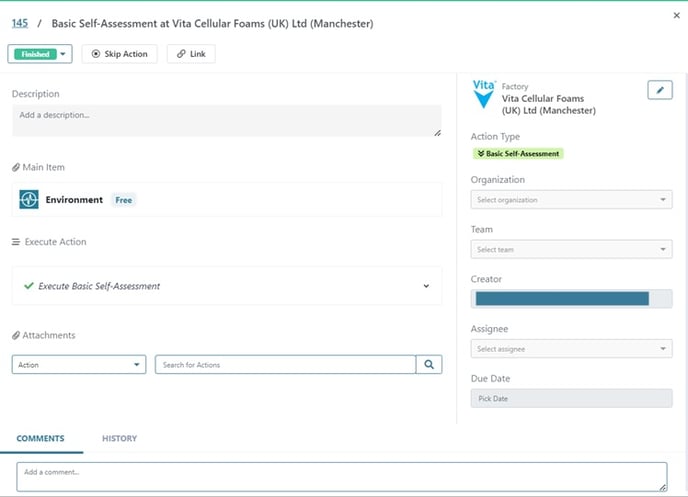
Fig. 26: Action window for a measure that has already been planned or implemented
The action can also be carried out in the same action window. The specified action is now suggested under the "Execute Action" tab (see Fig. 27); if this is selected, it can be executed using the "Take Action" button:
 Fig. 27: Execution of a planned measure
To give another example, in some cases the corresponding attachment must still be selected before an action can be carried out. In Fig. 28, the sending of a Code of Conducts has been planned, but the CoC still has to be selected in the action window.

Fig. 28: Selecting an attachment so that the action can be executed
Once the attachment has been selected, the "Execute Action" field appears. In this specific case, the supplier contact must be selected in the next step (if none exists yet, it must first be created). You can also define whether the most recent version of the questionnaire should be answered by the recipient, whether the recipient should receive a fortnightly reminder about the enquiry and whether an email comment should be added to the request.

Fig. 29: Selection of supplier contact and other relevant checkboxes
If the action has been carried out, a green tick appears below the "Execute Action" heading and a green box also appears in the bottom left-hand corner, indicating that the action has been carried out successfully. The action is still in "In Progress" status, as we have not yet received any feedback from the supplier. As soon as the supplier replies to the enquiry, the status of the action changes to "Finished".

Fig. 30: Feedback on action performed

Fig. 31: Status "Finished" as soon as the enquiry has been answered
2.3.1.11 Creating, pausing or skipping individual actions
In addition to the option of collectively planning or skipping actions, there is also the option of planning your own/individual actions if the actions proposed by Prewave are not appropriate (e.g. because the actions should have a greater effect or influence on the supplier). Individual actions can be defined for each supplier individually by selecting the three dots and clicking on "Add New Action" (see Fig. 32). In addition to the option of planning individual actions, all actions already set for individual suppliers can also be skipped under "Skip All Actions" in the same action window after selecting the three dots:

Fig. 32: Creating individual actions within the supplier overview
2.3.1.12 Taking corrective action in the risk analysis
As already discussed in chapter "2.3.1.4 Measures, scorings and items", a wide range of information on the individual suppliers can be viewed in the supplier listing area. For example, by selecting the drop-down arrow, the scoring for all LkSG-relevant event type groups, the action priority, or the measures planned to date and those proposed by Prewave. In order to set appropriate remedial actions and identify the relevant suppliers, all checkboxes (action levels) must be selected for the "Remedial Severity" filter (see Fig. 33). Once selected, all suppliers with one or more alerts for which potential remedial measures should be clarified with the help of an incident review are shown.

Fig. 33: Selection of severity levels to display the suppliers relevant for the planning of corrective actions
In the next step, the corresponding overall score must be selected for the relevant supplier, which then displays the supplier profile (see Fig. 34):
Fig. 34: Selecting the overall score to open the target profile and view the supplier's alerts
In the supplier profile, you must now check which alerts are relevant for the active reporting period. In the following example, the year 2023 would be the relevant reporting period - the alerts shown in Fig. 35 (marked with the red arrows) are relevant for the 2023 financial year.

Fig 35: Review of the alerts relevant for the reporting period in the supplier profile
In the last step, you must now determine for which alerts a documented investigation should be carried out and an incident review created as a result. To create the incident review, you must select the alert, which expands the supplier profile to include the alert window (see Fig. 36). In the top right-hand corner of the alert, you will find the "Create Incident" shortcut - selecting the shortcut takes you to the action window, where the remedial action for the supplier can now be planned and created.
Fig. 36: Review of the alert and creation of an incident review for documented clarification of the incident
2.3.1.13 The status of measures
An action can have one of the following statuses:
- Planned - the action has been planned and scheduled, but not yet carried out
- Requested - a self-assessment or chain of custody has been sent to the supplier for response, but has not yet been answered
- In review - Measure is currently being viewed/reviewed
- Finished - Action has been completed
- Aborted - Action has been interrupted/paused
- Failed - action has failed
2.3.1.14 Side topic: The actions section
The planned measures from the risk analysis and independently of the risk analysis are planned via the Actions section. The Actions area can be accessed via the user profile in the top right-hand corner of the Prewave platform:

Fig. 37: The Actions section can be accessed via the user menu
The structure of the Actions area can be compared with the "Measures & Action" area of the risk analysis, all suppliers are listed in the "Planner" view. These can be categorised again separately using the various filter functions, e.g. according to the existing collections or the predominant action priority of the suppliers. Furthermore, the individual scorings/ratings of the suppliers can also be checked in this area, preferred actions can be taken (suggested or individualised), skipped/paused or even edited:
Fig. 38: The Actions section. Displayed is the Action Planner
If the "Dashboard" view is selected, the user receives an overview of all planned measures. All specific information about the planned measures can be viewed here in detail, such as: the company involved (sometimes the location involved), the status of the measure, the employee assigned to carry out the measure, the creation, update and due date as well as the planned type of measure. The respective tabs can also be used as filters: By selecting the headings, the listed measures are sorted alphabetically, allowing you to find specific measures more quickly.
2.3.1.15 Side topic: Self-assessments
SSA (Supplier Self-Assessments) is a tool on Prewave that can be used to carry out assessments and evaluations. The tool also includes a reporting function which can be used to view the status and responses of the SSAs carried out with the respective suppliers. The SSA area can be viewed via the user profile in the top right-hand corner of the Prewave platform:
Fig. 40: The SSA section can be accessed via the user menu
- Public questionnaires (freely accessible): e.g. Prewave offers questionnaires for the LkSG area, which can be sent to the contact person of a supplier for answering as part of a self-assessment (Human Rights questionnaire, Environmental questionnaire etc.)
- Own questionnaires: can be imported or programmed as an upload document or interactive questionnaire, e.g. a company's own human rights or corporate social responsibility questionnaire
- Approved questionnaires: Prewave also offers questionnaires for a fee, such as Taylor Wessing questionnaires, which can be used to evaluate your own business area.

Fig. 41: Selection of questionnaires and available supplier self-assessments
Switching to the "Reporting" view displays the following dashboard, which shows the status of all planned self-assessments. The dashboard also provides a detailed breakdown of the response rate of the questionnaires used in the self-assessments.

Fig. 42: “Reporting” view in the SSA sections
All suppliers of your own organisation are also listed in the same area. All available questionnaires are listed again for each supplier, followed by the status, whether the questionnaire has already been sent to the supplier and the processing status. An SSA request can also be sent to the supplier using the "Send Request" button under the Actions tab, which opens the following window:
%20-%20Auswahl%20der%20Type%20des%20Assessments.png?width=688&height=395&name=Abb.%2035%20-%20Anforderung%20eines%20Self%20Assessments%20(Aktionsbereich)%20-%20Auswahl%20der%20Type%20des%20Assessments.png)
Fig. 43: Requesting a self-assessment (action section) - Selecting the type of assessment
Once the relevant questionnaire to be sent has been selected, the supplier's contact person is now defined:

Fig. 44: Selection of the supplier's contact person to whom the assessment is to be sent
In the final step it can be determined whether the latest version of the SSA that has been sent to the supplier should be answered (if several assessment requests have already been sent to the supplier) and whether the supplier's contact person should receive a fortnightly reminder until the questionnaire is answered (if the assessment is not answered on time, the contact person will receive fortnightly reminders about the assessment for the following two months). In addition, the selected questionnaire and supplier are documented again in the action panel, and an e-mail comment can also be added if further information is to be sent to the supplier:

Fig. 45: Preview/summary of the assessment
In addition to the option of sending enquiries to suppliers, reports can also be created - while the basic report shows the status of all SSAs that have already been carried out, the detailed report can be used to view the evaluation of the questionnaire that has already been carried out, including the answers provided:

Fig. 46: Creation of a basic or detailed report for individual suppliers
2.3.1.16 The reporting section
If the measures have been successfully implemented, the user is already in the last step of the risk analysis - reporting. In the following area, you have the option of generating a report or a summary of the previously performed risk analysis. To do this, the "Export" button must be selected (see Fig. 47); the exported report can then be downloaded by selecting the user profile under "Reporting". As an additional option, the "Approve for export" checkbox can be selected, which generates the BAFA report (this function should only be selected if the risk analysis has been completed and all measures have been planned and the BAFA report is now to be generated). Reporting and the further creation of the BAFA report via Prewave is described and explained in detail in chapter "4. Reporting".

Fig. 47: The "reporting" area of the risk analysis